

How To Create Custom Css In Wordpress
WordPress navigation menu is just like a road sign, you cannot reach your destination until you know your current location. Similarly, WordPress navigation menu with CSS plays an utmost role in your WordPress site.
As we all are aware of the great diversity in online business and websites. This difference is not only because of the content but also due to the experiments that they do with the normal features of their website, these experiments like with the navigation menu can play a crucial role for most blogging platform.
Fast forward, WordPress navigations menu is one of the most active parts of websites. If we talk about WordPress (blogging platform), so here themes handle where and how navigation menus are displayed. It also allows the customization navigation menu.
Let's understand the complete WordPress Navigation menu tutorial. Before this, we will tell you – what actually WordPress navigation menu is?
By the end of this post, will know given below topics;
- What is the navigation menu?
- Why add the WordPress navigation menu?
- How to create a WordPress navigation menu?
- How to add an item to the navigation menu?
- Arranging items in a custom navigation menu?
- How to edit menu item in the WordPress navigation menu
- How to remove the item from WordPress Navigation Menu
- Creating drop-down menus in WordPress
- Adding categories in WordPress menu
- How to add custom links in your WordPress navigation menus
- Understanding the theme location for your navigation menu?
- How to add navigation menu in the sidebar and other widget-ready areas
- How to style WordPress navigation menus
- Examples of Styling Navigation Menus in WordPress
- Adding custom post type archives in WordPress
- What is Mega Menu in WordPress?
- Creating a Mega Menu in WordPress
- How to add mega menus in WordPress
- Adding logout link in WordPress
- Adding WordPress Logout Link in the Sidebar Widget
Thus, this is what we are elaborating on here. Keep reading…
Navigation menu in WordPress
The navigation menu is a built-in feature of WordPress theme used to direct the user to other features or pages of the website. Further on, it makes it very easy to add, create and eliminate unnecessary menu from WordPress. By eliminating the unnecessary menu, it makes user easier to layout the website as per their choice. Here the menu can be quite confusing at first but, it is the most important factor for a great user experience which can only be categorized in as a successful business model.
However, WordPress navigation menu's location can differ from theme to theme. All WordPress themes come with at least one menu location. But some of them have multiple locations to face complicated sites. Likewise, you can customize your menus for footer and header parts in a different pattern.
Let's understand why it's necessary to add navigation menus to any WordPress site.
Why add the WordPress navigation menu?
Navigation menu code in WordPress offers a simple way to add a structured menu to your website. Thus, you can create a lot of navigation menus as you want in your WordPress Admin Area, though, you can only display them on the menu locations available in your WordPress theme.
What if you are required to add a menu to a post or page?
In that case, you have to manually create a list of links that are not efficient enough to manage as a WordPress menu.
Now let's have a look at the process of creating a navigation menu-
How to create WordPress navigation menu?
Basically, as a default, you do not need to install anything to create a simple menu for your WordPress site. Because it might not be the most elegant way or the one with the most useful customization options. But the WordPress menus work very well to clearly direct visitors through your website and where they seem to appear positive with a default theme provided. Before you start adding the navigation item, you need to first create it. Following are the steps for the same of creating the navigation item.
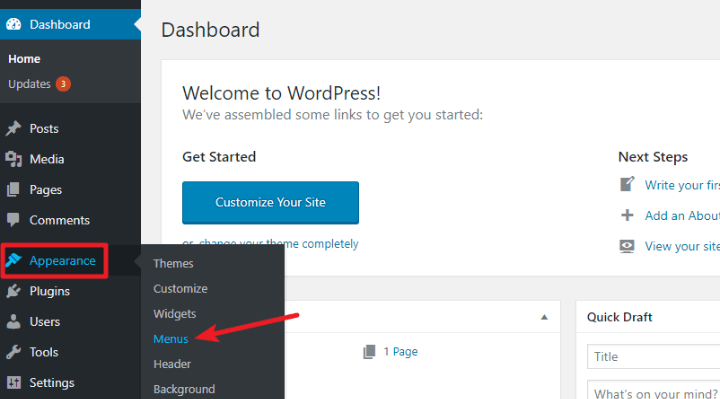
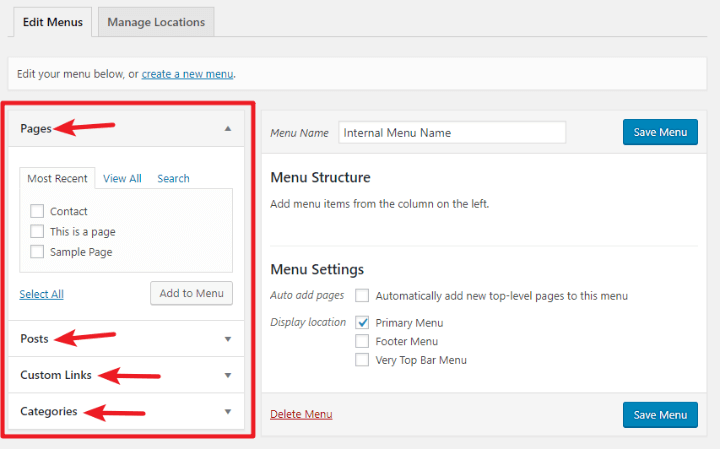
- Navigate to your WordPress dashboard and click on the Appearance>>Menus. As shown in below screenshot:
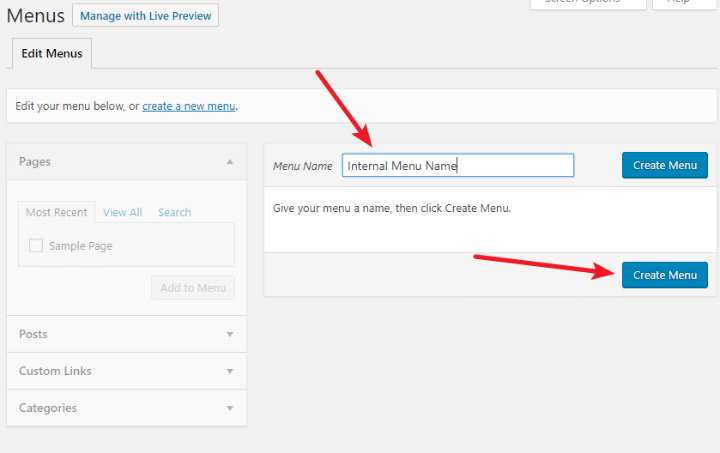
- Now, it'll ask you the Menu Name. Enter your menu name and click on Create Menu.
- After creating your menu, WordPress will show you a Menu Settings section. In this Menu Settings, you can choose a Display location, where to insert your navigation menu on your website.
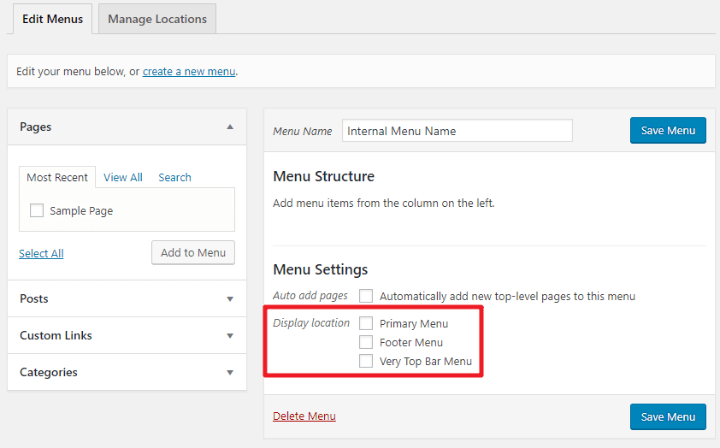
- Once you find, where to assign the menu, check that box & click Save Menu button.
Well done! you have successfully created a navigation menu.
Now add some items to this navigation menu. This is the first thing we do while we add a Navigation menu. Let's see how to add an item in the navigation menu.
How to add item to the navigation menu?
You can add items to your navigation menu and also customize it. To add an item to your navigation menu:
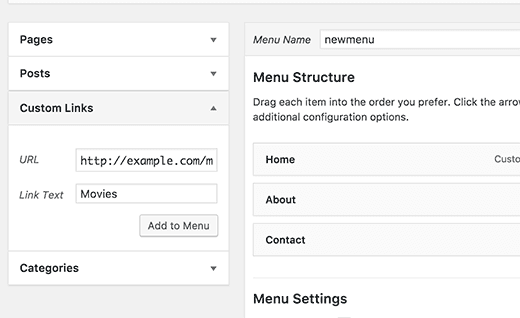
Go to the sidebar. Here, you'll notice that there are different sections such as Pages, Posts, Custom Links, and Categories.
- Posts & Pages: allows you to add links to any of your published posts or pages.
- Custom Links: allows you to add both internal and external links.
- Categories: allows you to add different categories links.
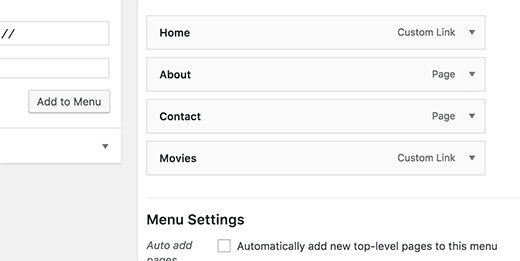
Check that box where you want to add a link. And then click on 'Add to Menu' button. Suppose that, you want to add a link to your 'contact us' page, so check 'contact us' page box and click 'Add to Menu' button.
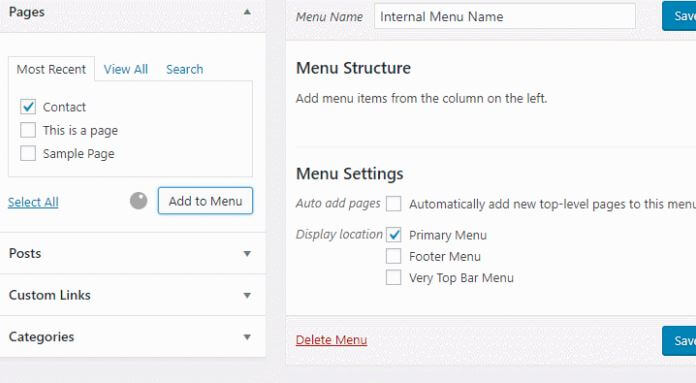
Once you click Add to Menu, you'll see it appearing on the right side. Shows that you have successfully added the navigation menu item.
Your menu will not do so much unless you specify what is in it. On the side of the page, you should now see dropdowns with posts, pages, custom links, and categories to choose from. All you have to do is just click on the checkbox next to any page that you want to add and click Add to Menu.
But you have to make sure to click use the View All tab, or the search function if you have too many pages. As soon as you have added a few items. Then you will need to include some info by clicking the arrow next to each element under Menu Structure.
However in the later on this blog, there is another way to add the Navigation menu in WordPress by using Shortcode. If you are a good coder, it's going to be an easy task for you.
Adding navigation menu item using the shortcode
As we have illustrated above, how to create your navigation menu?. Once your menu is ready, the next thing you need to take care of is how to add it to your posts by using a shortcode. Let's see:
To do this, just edit a page or post where you want to display your menu. Thereafter,
- Add a shortcode like this:
[listmenu menu="My menu"]
However, you can change "My menu" with the name of any navigation menu you want to assign.
That' it! You have successfully added your navigation menu in WordPress.
Adding WordPress navigation menu item using a plugin
You can also add your menu item with the help of the WordPress navigation menu plugin. Here, you won't require any coding knowledge.
- Simply, install and activate the Menu Icons plugin and add your menu item.
- After the activation process, go to appearance>>menus.
- Thereafter, open your navigational menu. Then choose a page in menu structure on which you want to show your menu item.
- Now select the item and click on the "Save Menu" button.
- That's it! You have successfully created it.
How to arrange items in a custom navigation menu?
If you have noticed that each & every menu item (that you have added) is arranged in the order you added them. Let's take an example; if your "contact" page appears at last (3rd position) and "home" page appears first, and you want to rearrange them, so you can do it easily and as per your choice.
To do the same, all you have to do is to just drag and drop a menu item in the menu to adjust its position. See the below screenshot;
You can repeat the same process if you want to create new menus for other theme locations. Now see how to edit menu item;
How to edit menu item in WordPress navigation menu
WordPress automatically picks the category or a page title name as the link text when you add categories or pages in custom navigation menu. But you can change it manually, which means that all the menu items can be edited.
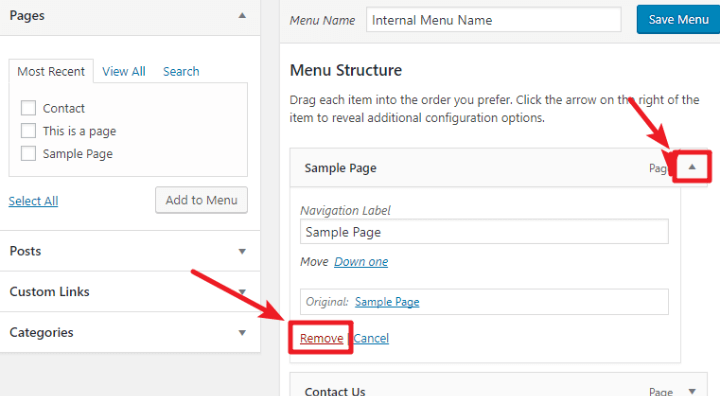
For this, all you have to do is to click the downward arrow button next to a menu item. See the below screenshot;
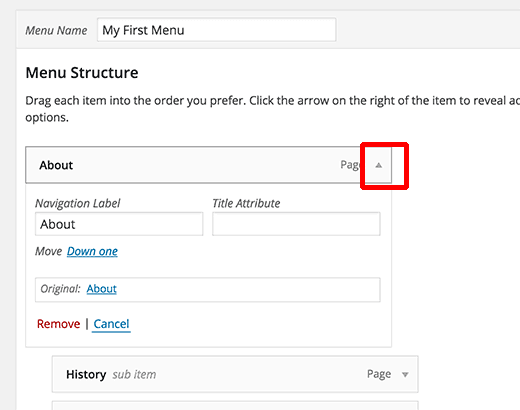
Here you can change the title and link text of your navigational menu. Apart from this, you can also add a title attribute.
Thereafter, you need to click the Save Menubutton to save your changes.
Now, let's talk about how to remove WordPress navigation menus items:
How to remove item from WordPress Navigation Menu
You can also remove menu items from your navigation menu. Click the down arrow icon and select 'Remove' button. See in below screenshot.
By default, your menu will be shown as a plain list. If you want to change the appearance of your menu, you need to style navigation menus in WordPress.
Over to this, now you will know how to create WordPress drop-down menu; have a look:
Creating drop-down menus in WordPress
Drop-down menus are also navigational menus with parent and child menu items. By creating nested menus you can add a structured navigation menu in a proper way to your WordPress website. However, WordPress themes style these menus in such a way – when a user hovers their mouse over a parent item, then all their sub-menus (child items) are displayed.

But the question is how you can add a sub-menu item in a WordPress navigation menu. let's see;
In your navigation menu structure, you have to drag the menu item just below the parent item. After that, slightly drag it (that you want to make sub-menu) to the right side. Thereafter, you will see that it will automatically become a sub-menu item.
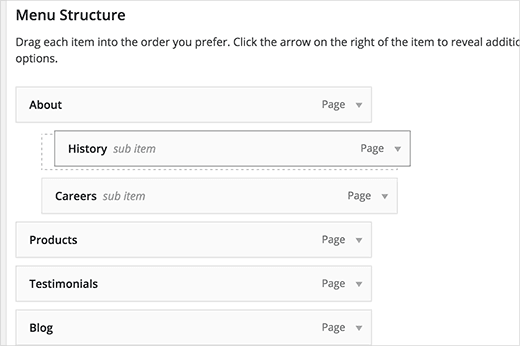
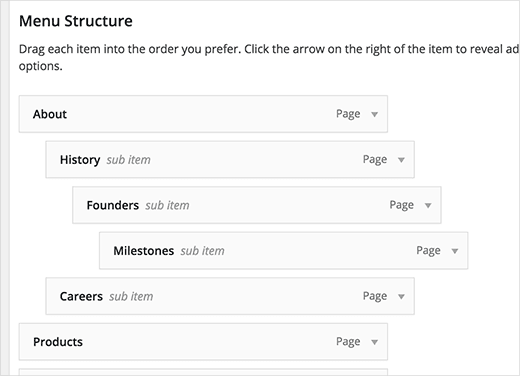
However, you can add a number of sub-menu items to create larger nested navigation menus.
Note: Remember that, all WordPress themes may not support multi-layer nested menus. Most of them up to 2-layers support.
Now see how to add categories in WordPress menus;
Adding categories in WordPress menu
If you are using WordPress blogging platform so you can add your blog categories similar to drop-down menu in the WordPress menu.
By default, WordPress menu comes with an option to add categories and pages.
To add the categories, on the menu editor screen go to the Edit menus column, thereafter click on the categories tab. Here you will see your blog categories.
Now choose the categories that you want to add to the menu. And press the "Add To Menu" button.
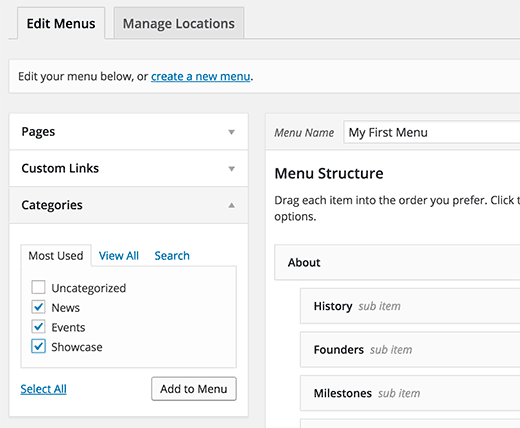
Now you will see your categories appearing as menu items. Similar to the pages, you can also drag and drop them to rearrange their position.
Here we will show you with the help of an example; see the below screenshot:
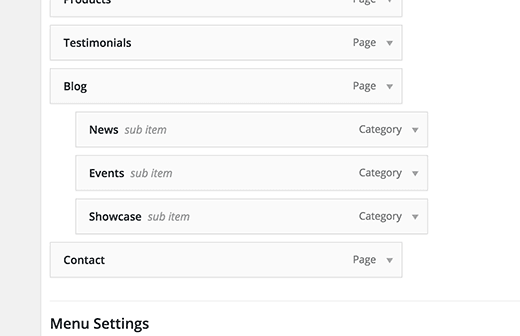
Here we have dragged all categories as sub-menu items under the blog page.
Adding custom links in your WordPress navigation menus
To add the custom links in your WordPress navigation menu, all you have to do is to click on the custom link tab in the left-hand column, here you will see two fields: first one is for URL – here you have to add the actual link that you want to add. The second one is Link Text – here you have to add the link anchor text.
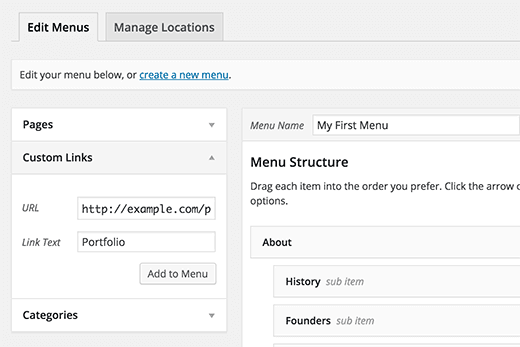
Note: Remember that all the links start with http:// or https://, if you don't use http:// or https:// then the links will be broken. Know why https:// is important to manage secure data transfer!
Understanding theme location for navigation menu
No doubt, a navigation menu is also one of the WordPress theme features. As one of the features, navigation menu a part of WordPress theme. These WordPress themes have the capability to handle a complete navigation menu for the appearance and the display. However, the user interface to arrange and add the menus is only provided by the admin.
Generally, each & every theme has at least one theme location for WordPress navigation menus and some of the themes may have more than one navigation menus as per the requirement of the WordPress administrator. For example, the theme we used here has three theme locations – primary, secondary, and a social menu.
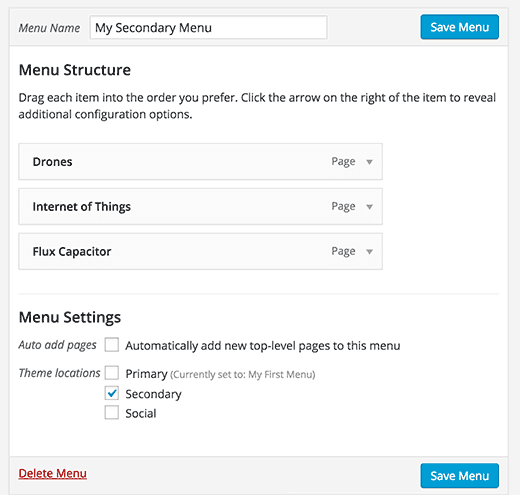
Remember that, these menu location's names will differ from theme to theme. Some themes call it primary and some call it header. It completely depends on the theme developer's preference.
Now know;
How to add navigation menu in sidebar and other widget ready areas
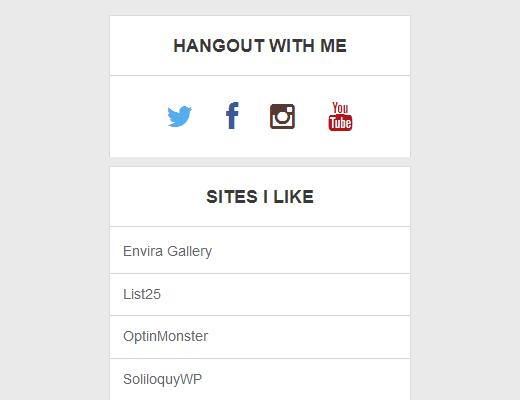
You can also add the WordPress navigation menus in a sidebar or any other widget-ready areas apart from the designated menu location that is set by themes. Here in the given below example, we have added social links and sites in the sidebar.
Apart from this, using widgets you can also add menus in your sidebars. Let's see how to do;
Open your dashboard and go to the Appearance>>Widgets. Thereafter, add the Custom Menu widget to a sidebar from the list of available widgets.
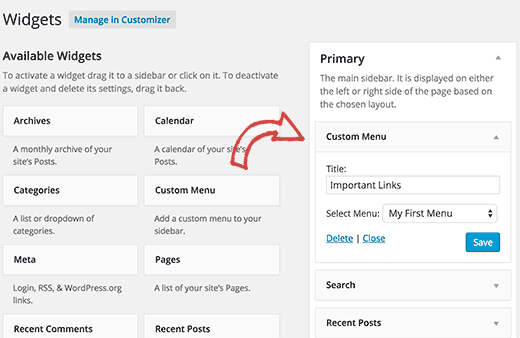
After that, opt a title for the widget heading and choose one of the custom menus from the drop-down menu list. Finally, press the Save button to save your widget settings. Now, you have successfully added custom menu in your WordPress sidebar widget.
If we come to the social icon, some of the themes may have in-built social media icons and some have not. In case your theme does not have, so use a Menu Social Icon plugin to add icon in your navigation menu.
That's all! Now talk about styling WordPress navigation menu;
How to style WordPress navigation menus
After creating a navigation menu, WordPress offers you many impressive ways to customize your menu. To style your Navigation menu you need to edit the CSS script of your WordPress. It can be done by two methods. Let's have a look:
Method 1. Styling WordPress navigation menus using a plugin
This is the best method for beginners because it saves you from editing theme file and you will not require any coding knowledge.
You can add your custom CSS for menus in your stylesheet of the child theme or by using the simple custom CSS plugin. If you are not familiar with CSS, then you can try CSS Hero. This is a powerful WordPress plugin, which allows you to design your own WordPress theme without writing a line of code (without HTML or CSS).
On activation, you will be redirected to CSS Hero license key. Just follow the instructions on the screen, and you will be redirected back to your website in just a few clicks.
After that, you have to click the CSS Hero button in your WordPress Admin Toolbar.
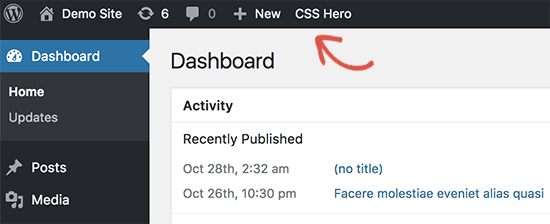
However, CSS Hero provides a WYSIWYG (What you see is what you get) editor. And after that, clicking on the button will take you to your site with the floating CSS Hero Toolbar appearing on the screen.
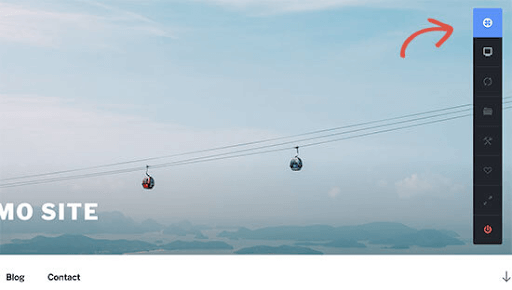
To start editing you need to click the blue icon at the top and move your mouse to your navigation menus. Your CSS Hero plugin will highlight it by showing the borders around it. When you click on the highlighted navigation menu, it will display you those items that you can edit. Let us start by editing, click the blue icon to navigation menu at the top left corner of your screen. This blue icon is highlighted by showing the borders around the icon. Once clicked, the display will show the items which can be edited.
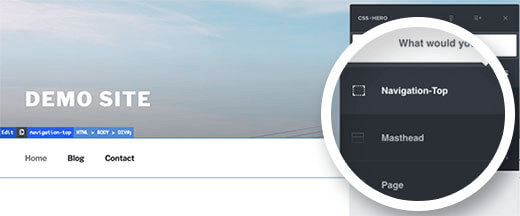
Now, the plugin will display you various properties, which you can edit such as background, border, text, padding, margin etc.
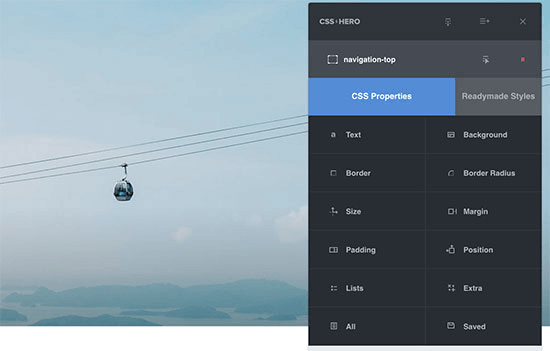
You can click on the property you want to change. As soon as you make changes, you will be able to see them live in theme preview. After this, at CSS Properties display, you can click on the property that needs to be changed. Once the changes are made, then you will be able to check the live site with the theme preview provided by the CSS Hero tool.
If you feel satisfied, click the Save button in the CSS hero toolbar to store your changes.
Methods 2. Styling WordPress navigation menus manually
Add custom CSS manually, which can be done easily if you are at least an intermediate user.
The WordPress navigation menus widgets are shown in an unordered list (bulleted list).
Typically, if you use the default WordPress menu tag, it will show a list with no CSS classes associated with it.
<?php wp_nav_menu(); ?>
In the unordered list, the class name with each list item will be 'menu', which should have its own CSS class.
This work can be done if you have only one menu location. However, you can display the navigation menu in multiple locations in most themes.
By using only the default CSS, a class may conflict with the menus on other locations.
That's why you have to define the CSS class and menu location too. Also, there are some chances that your WordPress theme is already doing this by adding a navigation menu, using a css class code like this:
<?php
wp_nav_menu( array(
'theme_location' => 'primary',
'menu_class' => 'primary-menu',
) );
?>
Also, this WordPress navigation menu CSS class code tells WordPress that, this is where themes show the primary menu. Also, it adds a CSS class primary menu in the navigation menu.
You can also style your navigation menu by using this given below CSS structure.
Navigation menu by CSS Structure
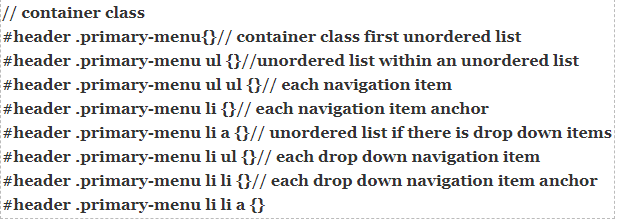
To change the header by the navigation menu, you have to change the #header with the container CSS class which is used by the navigation menu. And this structure will help you completely change the appearance of your navigation menu.
Although, there are other WordPress generated CSS classes that are automatically added to each menu and menu item. And all these classes also allow you to customize your navigation menu. Let's take a look:
Customize class code
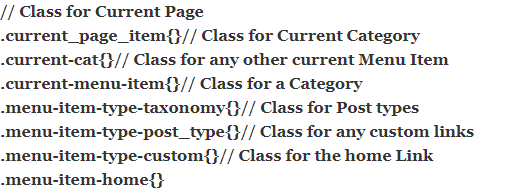
WordPress allows you to add your own custom CSS classes to individual menu items.
This feature can be used by style menu items, such as adding an image icon to your menus or highlighting the menu item by simply changing the color. In order to do this:-
Go to Appearance>>Menus page in your WordPress Admin area and click the Screen Options button.

Once you check that box, while editing each individual menu item you will notice an additional field is added.
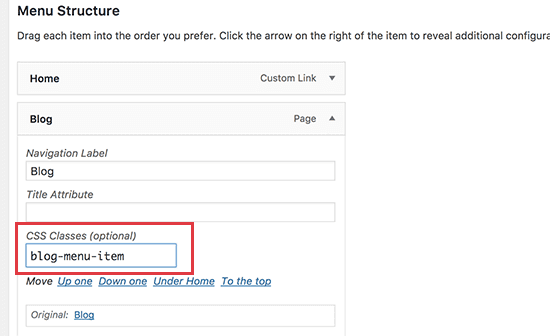
To add your custom CSS you can also use this CSS class in your stylesheet. However, it will effect on your menu item with the CSS class that you have added.
Now we will show you some examples of the style Navigation menu. Go through the example list for a better experience.
Examples of Styling Navigation Menus in WordPress
There are various WordPress themes, each & every theme can use different style options such as CSS classes, and even Javascript in WordPress navigation menus. However, it provides many options for customizations as it gives you a lot of options in your navigation menu and helps you to change CSS styles with .
Furthermore, the inspect tool in the web browser will help you to configure which CSS classes to change. Typically, click the element that you want to modify. And press the right-click and choose to inspect tool from browser's menu.
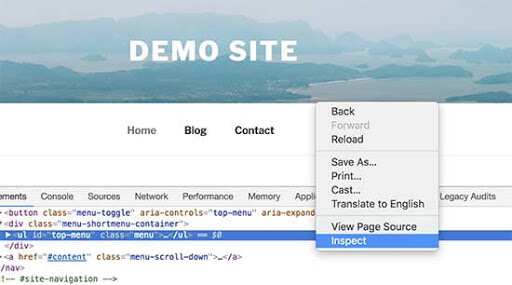
Given below are some of the examples of style navigation menus in WordPress:
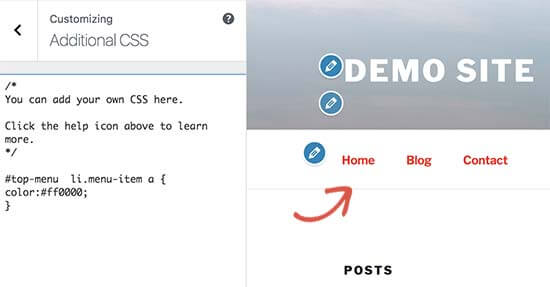
#1. Change your font color in WordPress Navigation Menus
You can change your font color of navigation menus by adding given-below custom CSS class code to your theme.
#top-menu li.menu-item a {
color:#ff0000;
}
Here, in the above code – the "#top-menu" is the ID that is allocated to the unordered list and shows the navigation menu. Further, by using the inspect tool you can configure that the ID is used by your theme.
#2. Change the background color of the WordPress navigation menu bar
The very first thing is, to find the CSS ID of your theme.
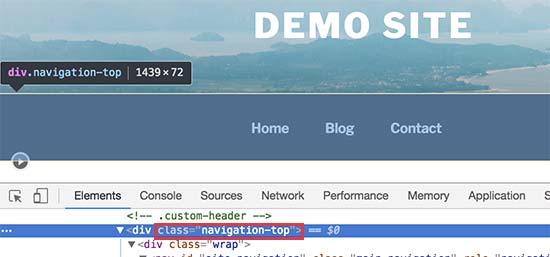
Afterward, use the given-below custom CSS code in order to change the background color of the WordPress navigation menu bar. Now your site looks like this:
.navigation-top {
background-color:#000;
}
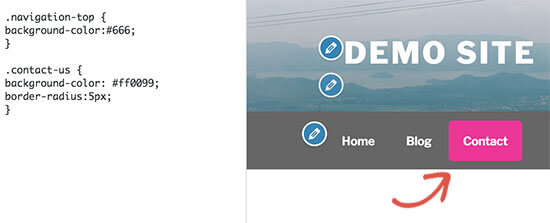
#3. Change the background color of your single menu item
You might have seen that different sites use different colors for important links to make them get noticed. These links can be a sign-up link, login link, contact link etc. To accomplish it-
You will need to add a custom CSS class (which you want to highlight) to your navigation menu item.
To do this – open your WordPress dashboard and go to Appearance>>Menus. You will see a 'Screen Options' button, click on it. After that, a fly down menu will open, here you have to check the 'CSS Classes' box option.
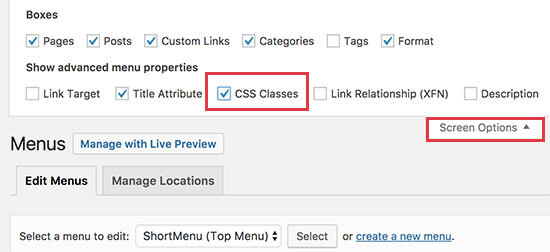
Thereafter, go to the menu item that you want to modify and click to expand it. After doing this, you will see a new option to add your custom CSS class.

Thereafter, use the given-below CSS class code to style that menu item differently.
.contact-us {
background-color: #ff0099;
border-radius:5px;
}
Now your site will look like this:
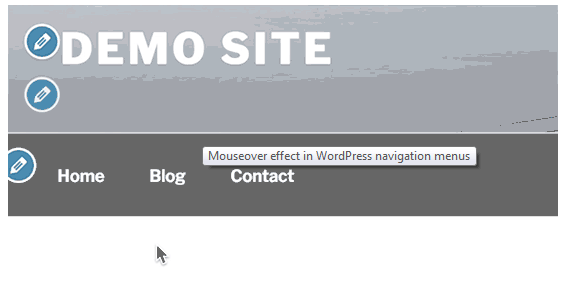
#4. Adding hover effects to WordPress navigation menus
Now you can also change the color of your menu item on mouse-over, this CSS trick makes your navigation menu more interactive. Follow the given-below custom CSS code and add it to your theme.
#top-menu li.menu-item a:hover {
background-color:#fff;
color:#666;
border-radius:5px;
}
In the above example, "#top-menu" CSS ID is used by your theme for unordered navigation menu list.
Now, you can see how your site look:
#5. Creating sticky floating navigation menus in WordPress
The sticky floating menu allows you to create any element on your landing pages sticky. That means, whenever you will scroll down, your menu items will get disappear. This is usually used to keep your menus at the top of your page.
You will have to choose the right selector for the element you want to make sticky and make sure it's a unique selector, for that you should be aware of the basics of HTML/CSS. Sometimes a selector, for example, "nav", ".menu-main-menu-1" is sufficient while other times you will have to be more concise and use a more brief selector like "header > ul:first-child" or "nav.top .menu-header ul.main".
It is mainly used for navigation menus and grants you to select any precise element with a name, class or ID at the top of the page.
You can add any amount of selector between the sticky element and the top of the page. By doing this the element is not always stuck at the ceiling of the page.
It checks if the current user has an Admin Toolbar at the top of the page.
It finds out the possible reasons that why your element doesn't stick by switching on debug mode. The error messages will be displayed in your browser's console.
There are two methods of adding sticky floating Navigation menu one by a plugin or by short code. Furthermore, go through both processes.
Method 1. Adding sticky floating navigation menu via plugin
This is the easiest method to use and it is suggested for all users.
First of all install and activate the Sticky Menu on Scroll Plugin.
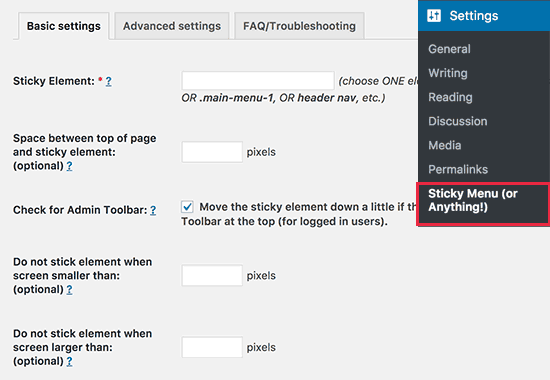
After activation Go to Settings » Sticky Menu (or Anything!) page to configure plugin settings.
Enter the CSS ID of the navigation menu that you wish to make sticky.
By using the inspect tool from the browser in order to search for the CSS ID can be used by the navigation menu. After using the inspect tool try visiting the website and go to the navigation menu.
Then after a right click, choose Inspect from your browser's menu. And it will split your browser screen in half and you will be able to see the source code. try searching the for the line of code given below:
<nav id="site-navigation" class="main-navigation" role="navigation">
Next enter the navigation CSS ID in the plugin settings like this #site-navigation.
Define the space between the top of your screen and the sticky navigation menu. You can use this if your menu is coinciding an element that you do not want to be hidden. If not, then overlook this setting.
Click the checkbox next to the option: 'Check for Admin Bar'.
The setting page acknowledges you to unstick the navigation menu when a user is visiting your website via a smaller screen. In case you don't like it, then you can add 780px to this option.
Just click on the save settings button to save your changes. Now you can visit your website to see your sticky floating navigation menu in action.
Method 2. Adding sticky floating navigation menu manually
This method allows you to add custom CSS code to your theme.
Firstly visit Appearance » Customize for launching theme customizer.

Next, Click on 'Additional CSS' in the left pane and then add the below-given CSS code.
#site-navigation
{
background:#fff;
height:60px;
z-index:170;
margin:0 auto;
border-bottom:1px solid #dadada;
width:100%;
Position:fixed;
Top:0;
Left:0;
Right:0;
text-align: center;
}
After that replace #site-navigation with the CSS ID of your navigation menu, click on the Save & Publish button.
Now you can visit your website to view your sticky floating navigation menu in action. If your navigation menu normally displays after the site header, then this CSS code could overlie the site title and header.
It can simply be adjusted by adding a margin to your header area using some CSS like shown below.
.site-branding {
margin-top:60px;
}
At last, replace site-branding with the CSS class of your header area.
#6. Creating transparent navigation menus in WordPress
Transparent navigation menu in your WordPress site makes your navigation item visible, to let the users see your menu clearly.
For example, a lot of sites use fullscreen background images with the call to action buttons. Because by doing this, users have more possibility to focus on your call to action button. But the question is how to do it? Have a look we will show you with few steps:
To make your navigation menu transparent you have to add the given-below custom CSS code to your theme.
#site-navigation {
background-color:transparent;
}

Now you can see how your site look:
You can also fix the header image position if needed so that the image can cover the behind area of your transparent menus. But it depends on your theme.
Over to this, another interesting thing is that – you can add the archive page in your navigation menu. This archive page shows a list of all the posts under a specific category, post type, or tag. Let's see the process.
Adding custom post type archives in WordPress
In WordPress, the word 'Archives' is used for a list of entries from a taxonomy or post type (such as tags or category). In case archives are enabled for the custom post type, you can see them on your site.
Generally, the URL of a custom post type archive page is like this:
http://example.com/post-type-slug/
Post type slug is a good name for your custom post type. For example, we have a custom post type, named as 'Deals', and you can see its archive page on a URL in this format:
http://www.example.com/deals/
You can add a link to your custom post type archive page in your site's navigation menu. It will allow your users to view all the previous entries posted on that post type on a single page.
To add a link to your custom post type archive page in WordPress navigation menus, follow the given steps.
Adding Link to Custom Post Type Archive
Go to the Appearance>>Menus page. You will see a tab for each of your custom post types in the left column.
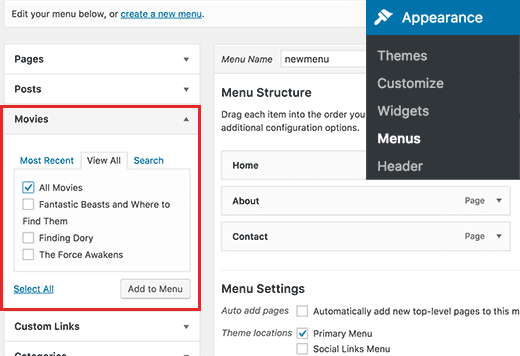
To expand this, you will need to click the name of your custom post type and then click on the 'View all' tab.
Now, you will see an option for your post type archives. Check the box next to it and then click the Add to the menu button.
Now your custom post type archive will appear in the right column as a menu item.
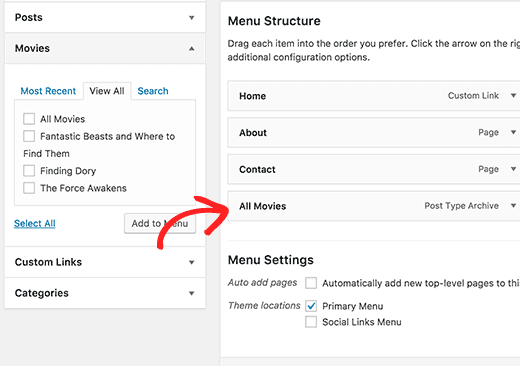
By default, this will use the name of your custom post type with the word archives for the link label.
If you want to change it into something simple, edit it, click the menu item and then change its navigation label.
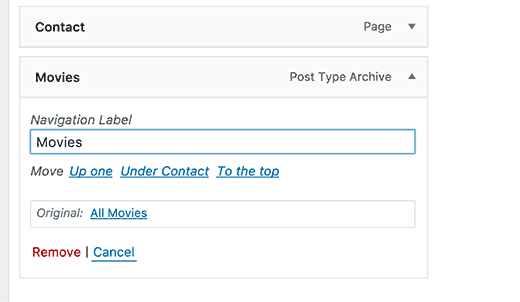
Keep in mind that don't forget to click the 'Save menu' button to save your changes.
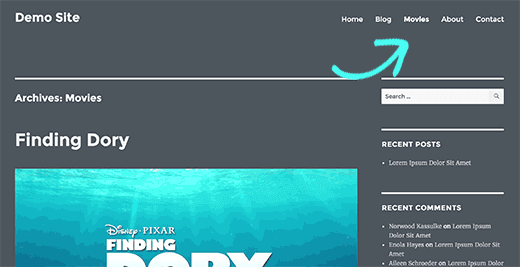
Now you can visit your site to view the custom post types archive links in your WordPress navigation menu.
Just like the pages and posts, you can also add a single entry from your post type to the navigation menu.
Simply choose an entry and after that click the add to the menu button.
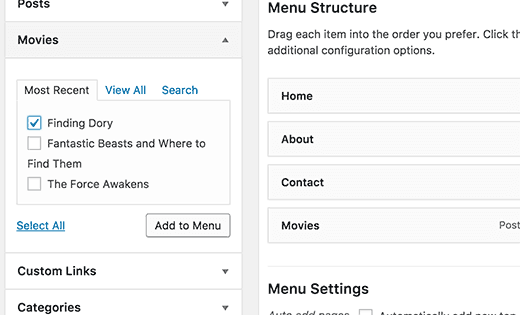
Press the save menu button to save your changes.
That's all! Moreover, you may notice sometimes custom post type doesn't appear on the menu screen. To make it visible in the Menu screen, follow right here
Custom Post Type does not appear on menus screen
The Custom post types require to match certain requirements in order to be displayed on the Appearance>>Menus page.
First, you need to ensure that there is an archive page for your custom post type. Usually, this is a URL like this:
http://example.com/movies/
Change example.com with your own domain name and change movies with your post type.
If you can view entries from your post type on this page, it means that your post types support archives but does not support other requirements.
The good news is that you can still add your custom post type archive page as a custom link.
Go to the Appearance>>Menus page and after that click the 'Custom Links' tab to expand it.
Enter the URL of your custom post type archive page in the URL field. And then add the label that you want to display in the link field.
After this, click the add menu button, and you will see that the custom link will appear in the right column.
Now you can click the Save menu button to save your changes.
For more customized styles with beautiful menu items, WordPress offers you many Mega Menu plugins. Let's see how to add a mega menu. Before that let's get an overview for Mega Menu.
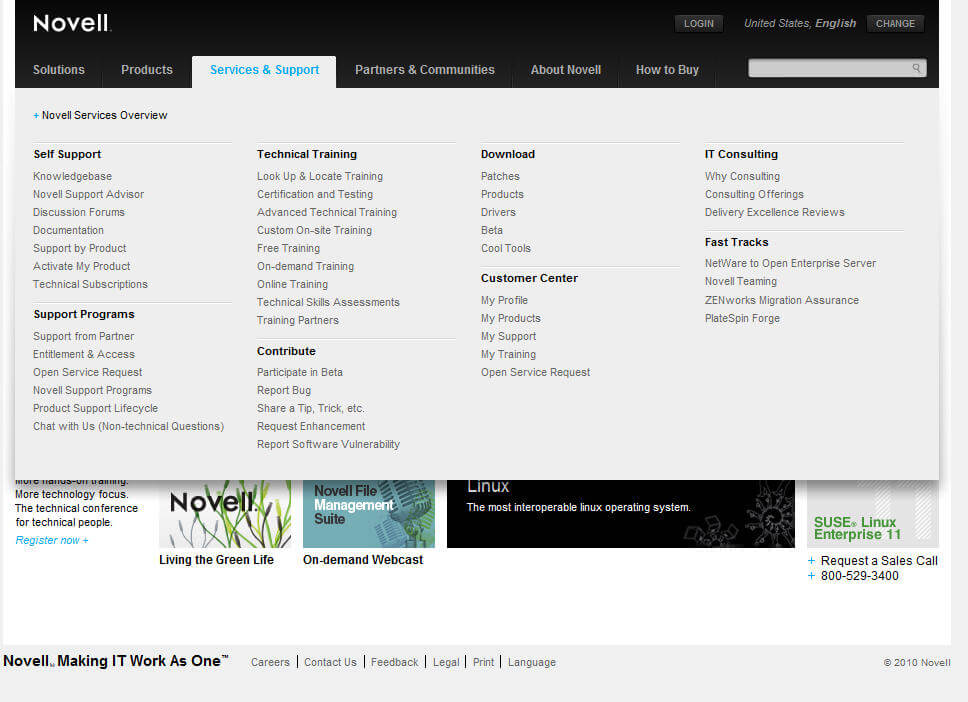
Mega menus are a general design pattern on large WordPress sites. Such sites may have a complex information architecture with various sections and subsections. It makes it easier for the user to find correct information rapidly by grouping similar links together.
They are an excellent design choice for accommodating the big number of options or for announcing lower-level site pages at a glance.
Moving on, here you will learn how to add Mega menus in WordPress Navigation menu.
Mega Menus are generally helpful for sites with many contents. It allows website owners to display more items on their top menu.
Some of the famous websites like Reuters and Buzzfeed use mega menus for showing interactive navigation menus.
While the default WordPress navigation menus allow you to add drop-down sub-menus and even add image icons next to each item, some of the times you just require a mega menu.
Let's see how to easily add a mega menu to your WordPress website. Before this, we will share how to create it.
Creating Mega Menu in WordPress
Creating a Mega Menu is not a difficult task. Follow the steps to create a mega menu in WordPress.
Firstly visit the Appearance » Menus page and then add top-level items to your navigation.
Next, on the Menus screen enable mega menu. After that take your mouse to a menu item, and you will see a "Mega Menu" button appear on the menu tab.
Clicking on the button will show a popup. Here you can add any WordPress widget to your mega menu and choose the number of columns you want to display.
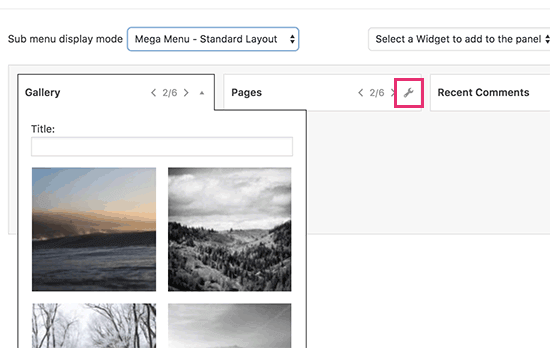
You can also tap on the wrench icon on a widget to edit the widget settings. Just click on the save button to save your widget settings. Once completed you can close the popup and visit your website to see the mega menu in action.
How to add mega menus in WordPress
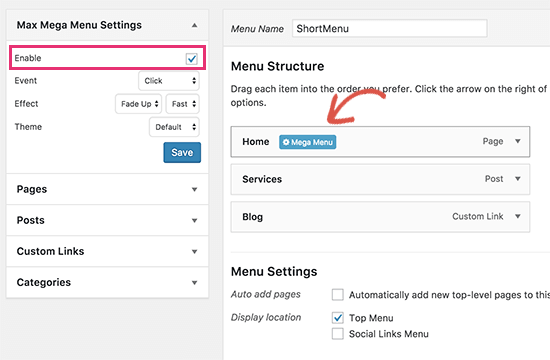
At very first, install and activate the Max Mega Menu plugin. It is the best free WordPress plugin available in the market. For more information, see our step by step guide on how to install a plugin in WordPress.
After the activation, the plugin will add a new menu item, Mega Menu, to your WordPress admin menu. Tapping on it will take you to the plugin's settings page.
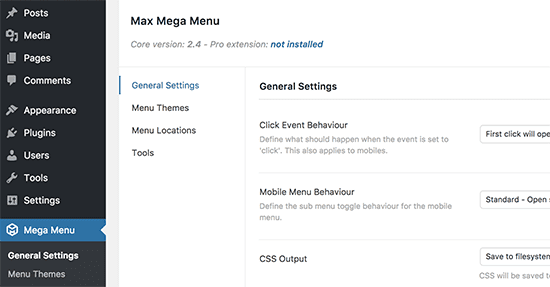
- The default settings will work for most sites. As the default settings are provided by the developer which has many general settings options available for the user.
- In order to match the colors in the Navigation menu you have to change the menu colors, so that it can match the colors used by your WordPress theme's navigation menu container.
- The inspecting tool in the browser provides the usability of finding the theme color. To find which colors are used in your theme, you can use the Inspect tool in your browser. After you get the color hex code, paste it into a text file for using it later.
- Up next visit the mega menu settings page, click on the Menu Themes tab and then tap on Menu Bar section. Here you can replace the background color used by the mega menu for matching your theme's navigation menu container.
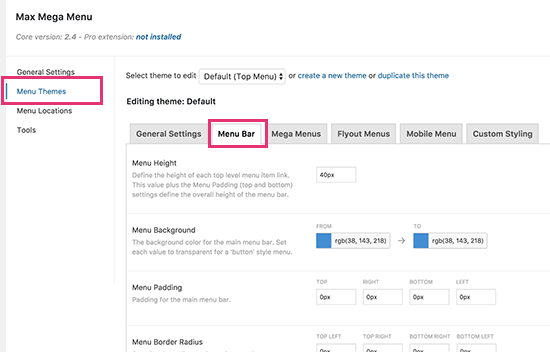
- After that click on the save changes button to save your settings.
Another thing that we would like to share is the Logout link in the navigation menu. So many times we have encountered with the question of how to add a logout link in the menu. In the next heading, we will cover the same.
Adding logout link in WordPress
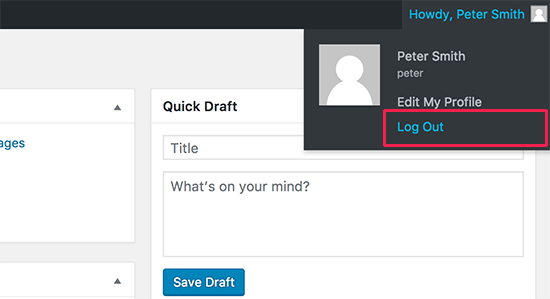
Generally, you can log out of your WordPress website by clicking the logout link. The WordPress logout link is located below the profile picture in the top right corner of WordPress Admin Bar.
- All you have to do is take your mouse at your username, and it will appear in the drop-down menu.
- If your site administrator has disabled the WordPress Admin Bar, you will not be able to see the WordPress logout link.
- The great thing is that the WordPress logout link can be entered directly to log out of your existing WordPress session.
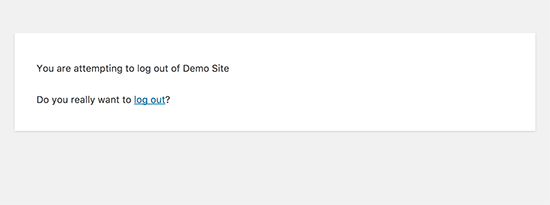
The logout link for your WordPress site looks like this:
http://example.com/wp-login.php?action=logout
Note: Don't forget to replace the example.com with your own domain name.
Also, you can access this link directly in your browser window to log out of your website.
- When you go to the WordPress logout link, it will take you to a warning page. You will have to confirm that you want to log out in order to click on the logout link.
Also, you can manually add this logout link anywhere on your website. Let's see how to add it:
Adding a WordPress logout link in the navigation menu of your website will make it easily accessible from any page on your WordPress site.
- Just go to the Appearance>>Menus Page in your WordPress Admin.
- Next, you have to click the custom links tab to expand it and click the logout link in the URL field.
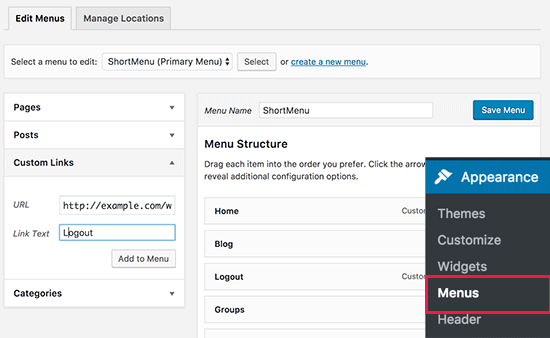
- Once done, then click the 'Add to menu' button, you will see that the link will appear in the right column. Now you can adjust the position of it by simply dragging it up or down.
- Don't forget to press the 'Save Menu' button to save your changes.
- Now you can visit your website to view the logout links in your navigation menu.

The problem of adding a logout link to the navigation menu is that it is visible to all the users (log-out and logged-in both). It only makes sense to display WordPress logout links to those users who are actually logged in.
How to add WordPress Logout Link in the Sidebar Widget
However, WordPress comes with a default widget called Meta. This widget displays a bunch of useful links containing the login or logout link to users.
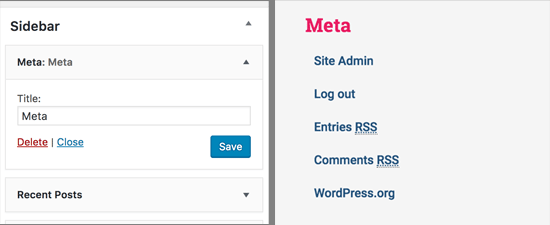
More so some people know that other links in the Meta widget are not quite useful.
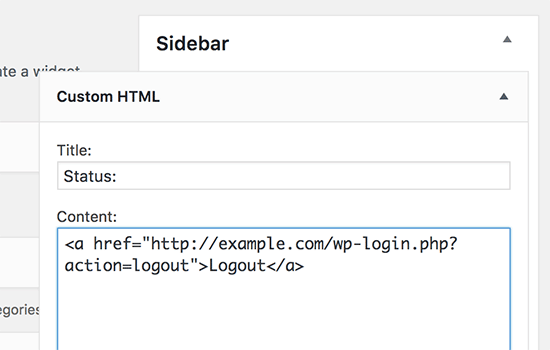
Alternatively, you can also add custom HTML widget or plain text with a logout link in plain HTML.
Here's the HTML code that you need to add:
<a href="http://example.com/wp-login.php?action=logout">Logout</a>
Create A Custom Navigation Menu With Elementor
As you know when it comes to build a good website User Interface, it takes a lot of effort to clearly understand and upskill the development to a big level and in order to achieve a better User Interface one of the most important parts of the website design is navigation menu.
However, people will struggle to get around without an easy to use menu as this always occur due to a bad development of User Interface where a user gets a clear way to navigate through the web application, that seamlessly directs visitors through your website.
Although when they get frustrated, it makes the users feel the uneasiness in browsing the particular web page and make them confused with the agenda of the web page from its agenda which makes the users unexpectedly and abruptly leave the web page for better suitable user interface.
A boring navigation menu can also significantly detract from your site, even if it works well enough. This is where even expert UI designers struggle in creating menus that are not just beautiful and interesting, but also simple and intuitive. If you want to design a good looking menu for your site, you have a few options.
The first is by using WordPress' default menu editor simple but gets the job done, or by designing a highly customizable menu with Elementor's Nav Menu widget. In the following post, we will go over step-by-step instructions on two ways of creating a menu in WordPress, one in the default editor, and the other with Elementor.
Just follow these instructions and you'll have your own beautiful menu in no time. However, you should note that you will need to have a default WordPress menu created to use the Nav Menu widget, so make sure to follow this till the end even if you only want to use Elementor.
Well, if you want to create a custom navigation menu with the help of Elementor's Nav Menu widget. Therefore you will have to install any available version of Elementor Pro installed on your WordPress website. Although if you are using the free version of Elementor. Then you will have to continue with the default WordPress menu, or you can use a third-party too.
However, you will get a lot of benefits with Elementor Pro. Therefore you will get access to WooCommerce sites, marketing Popups, a builder for Themes, 300+ templates, more animations for your site, and extra widgets just for WooCommerce users. In addition, you will also get a few more pro widgets such as Countdown, the Call to Action button, Reviews, a Posts List, and various Facebook Blocks alongside with the Nav Menu.
However, the Elementor's Nav Menu widget itself comes with some more extensive features as given below:
- You can place the Nav Menus anywhere on the page you want.
- No need to place it in the header or at the top of your page.
- Go wild and place the navigation menus even within the posts.
- You can add as many menus on a site or page as you want.
- Easily add elegant hover animations as per your requirement.
- Highly mobile responsive and the ability to customize it easily.
- Control how the menu will look on computers, tablets, and phones.
- You can change typography, color, and other design elements.
- Pixel-perfect precision with spacing, padding, and align options.
Now let us get more information in order to know how to use all of these options with the Nav Menu widget.
First Make a Nav Menu in Elementor
As we have suggested above, so if you want to get started. Then you are going to need or you must have a default WordPress menu, that has to already created. Therefore you should make sure to follow the tips above to learn how to do such. Thus if the WordPress menu is complete. Then it is time to add this menu to your website with the help of the Nav Menu widget.
However, to do that at first you should create or edit a template whichever you want to appear in your menu for example in a header. Then go for the Nav Menu widget and add it to your desired location. As soon as you finished your WordPress menu then it is now editable in Elementor, so now time to get customizing.
Customize Animations And Layout
Well, on the left-hand sidebar you can see the three tabs, that named Style, Content, and Advanced. So now the very first thing that you should do (if it is not done already) is to go to the Content and change the Menu to the one you want to display. So this process will allow you to see it in the preview screen.
Now under the Layout, you are able to set the menu to be vertical, horizontal, or even a hidden dropdown too. All you have to do is just try it out and immediately you will see that how it looks in different styles. In addition, align allows you to change the alignment of your menu items.
Also, when it comes to the animations then you have to quite a few options. These options include the over-, under-, and double-line animations as well as background, framed, and subtle text animations. However, you can click the pointer dropdown to select the specific type that you want. After that click on the Animation to see the individual options.
Because there are some examples in the action. Although the Submenu Indicator can change that, how the arrow icons of submenus are displayed. So if you want to customize the submenus a little more. Then go to the Style tab and uncollapse Dropdown. Change how they act on normal and hover states, customize typography, add a border, shadow, or divider, and of course tweak the padding.
Customize Spacing And Colors
Well, as soon as you have your own menu layout that you like. And now it is time to customize it a little more with padding and color options. However, to do so go to the Style tab and uncollapse Main Menu. So that you can control everything about the design of your menu items.
In addition, you can switch on typography to change the weight, font, text size, set it to all upper or lowercase, and change the styling with individual choices for each type of device. Also, you can make your text larger on mobile, a different color entirely on desktop, anything you like. In addition, use the Text Color and other Pointer options to customize the color of your menu links.
Such as while normal, hovered, and when it is the active page. Use the Hover and Active buttons to change or edit the different states. Besides that, customizing spacing with pixel-perfect precision is also easy with it. And everything from letter spacing, text padding, and line-height is available. You can set a number or drag the bars to change it.
- Vertical Padding – Conversely, this is the space between the top and bottom of the column, or the menu items if you're using a vertical layout.
- Pointer Width – The thickness of the lines that appear on hover and when a menu item is active.
- Horizontal Padding – This is the space between each menu item, or between the menu items and the column edges if you're using a vertical layout.
- Line-Height – This changes the height of the line, the padding above and below text, similar to vertical padding
- Space Between – Use this value to put more space between each menu item.
- Border Radius – This adds rounded corners if you have a background color.
- Letter Spacing – Higher values mean more spacing between each letter.
However, you can set a different value for desktop and tablet mode if you set your breakpoint to be on mobile devices. Otherwise, you need to edit the mobile options. And finally, the Advanced tab allows you to set CSS classes, change the margin and padding, add a background image to the menu, change responsive settings, and more. But be careful editing these as you could break your site for mobile users.
Configuring The Mobile Menu
Although the widget of Nav Menu also comes with some mobile options under the Layout tab, to optimize your menu on smaller devices. Although the list of options is explained as follows:
- Align – you can Center the links of the mobile menu, or you can have them appear on to the side.
- Toggle – This option can keep the hamburger menu such as three lines indicator, or you can turn it off entirely for mobile.
- Breakpoint – When does your layout of the menu can change to better suit smaller devices. Also, a tablet or mobile resolution too.
- Toggle Align – You can align the hamburger icon left, center, or right.
- Full Width – You can turn this on, and the mobile menu can stretch across the screen, rather than just around the column width of your nav menu.
Under the Style tab, you will find options to customize the appearance of the mobile menu toggle as well with the help of the Toggle Button. In addition, you can customize the color, change the size, background, and add a border.
Also, you should remember there is an option for Responsive Mode at the bottom of the Elementor sidebar. Therefore it allows you to see a preview of how the mobile menu will look on both tablets and mobile screens.
Wrapping Things Up
The navigation menu on any website is an important part. So, we need to deal with it on priority. Because it does not only add to your site's appearance but also gives direction to the visitor to take action accordingly. We hope the article helped you to customize the navigation menu on the WordPress website. Don't forget to use the comment section to make a conversation.
There are several options to create a custom nav menu into the WordPress. As you have seen before, the basic or default settings of the platform are perfect to do its job and these are very easy to use. However, if you feel like your menu is missing something, or it is not quite as flexible as you need it to be.
Therefore the Elementor Nav Menu widget might be a good choice for you. Because it makes customizing and creating the menus just a simple task. Hence it is flexible and full of potential. In short, it does not just do the job it finishes it. If you like the content please share it with others as well.
How To Create Custom Css In Wordpress
Source: https://www.wpglobalsupport.com/customize-wordpress-navigation-menu/
Posted by: francisviode1952.blogspot.com
0 Response to "How To Create Custom Css In Wordpress"
Post a Comment